Each year in both spring and fall, large white birds fly over the Okanagan Valley. Many people see them and wonder what they are. Many guess pelicans at first, but usually dismiss their initial guess, because they aren’t 100 per cent sure that you can find pelicans in B.C.
It’s happened for years, and reports of pelicans landing in Penticton, Kelowna, Vernon, Nicola Lake and Shuswap Lake all support the fact that these birds are on the migratory flyway en route to the Chilcotin, most likely in the Stum Lake area. Initially a protected area, and home to White Pelican Provincial Park, the birds have been reported to have been nesting in the region, including the Puntzi Lake area; others have been observed on Anahim Lake, and other Chilcotin lakes as well.
In the past few years, the water level at Stum Lake has been lower than normal, which has allowed predators to get closer to the nesting sites. Reports of breeding pelicans have increased on Puntzi Lake, where in previous years the birds have been reported to be fishing on a regular basis.

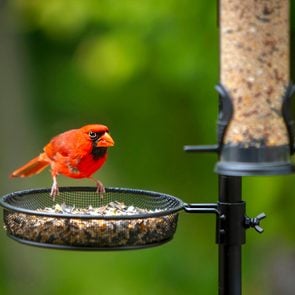
The birds shown in the photos here were taken at Kin Beach in Vernon B.C., in the spring. You will notice a large, orange horn or plate on the beak, about a third of the way up on their bright orange bill. It is found on both male and females during breeding season, and will disappear once the eggs have been laid.
Frequently, pelicans are also found on Shuswap Lake in numbers of 20 or more, and it is possible that they have flown in after failed nests in the Chilcotin. In the fall these large white birds will return to California or Mexico for the winter. Large numbers of pelicans also winter in Klamath Falls, Oregon. American white pelicans are one of a group of birds known to do their fishing in groups. They move schools of fish into shallow water to a location that allows the pelicans to scoop them up in their pouches. A pelican can hold up to about 12 litres of water and fish in its pouch.
From what I understand, it’s estimated that more than half of the world’s population of white pelicans are found in lakes and rivers from British Columbia to Manitoba.
Here are more Okanagan birds worth adding to your bird-watching list.


I’m a technology management adviser who now works in the estate planning field, helping estate advisers figure out how to deal with the digital lives and digital footprints of the recently deceased. It’s made me all too familiar with how the digital world has permeated our lives. Nowadays, we own a new set of assets, digital assets, that include our email, loyalty points, online access, social media accounts, gaming points, travel rewards, and, in some cases, our crypto-currency assets.
Estate Planning in the 21st Century
Similar to physical assets, digital assets must be accounted for in estate planning because they have either financial or emotional value. Lots of us save up loyalty points in a variety of programs, and if we don’t get around to using them before we die, we likely have wishes about who should get them. Those wishes need to be documented the same way we document our wishes for our physical assets. All of our assets, digital and physical, should be inventoried, expressed, and captured in our will and estate documents.
The Trouble With Digital Assets
For a number of reasons, digital assets, unlike physical assets, have a little more complexity upon our passing. Firstly, they may not be readily visible online, and it may be hard for your executor to find them. But for starters, your executor needs to know they exist. Secondly, even if the executor knows these assets exist, many of the online account providers have Terms of Service or usage conditions that prohibit another individual’s access upon death, even if they are our executor. We readily agree to these terms when we sign up for these services.
CTV’s Jackie Dunham reviewed the terms of a number of different loyalty programs in her article, “What Happens to Your Loyalty Program Rewards When You Die?” and, of the loyalty programs she assessed, each had different provisions in terms of what happens.
Unfortunately, the topic of our digital assets upon death is relatively new and not a lot of people have wrapped their heads around this yet. As consumers, we are hawkish about our purchases, conscientious about saving where we can, and make buying decisions about which retailer we choose as a result.
Less than 50 per cent of Canadians have a will, and in my view, too many have a “we don’t care about what we don’t know” attitude about estate planning.
Well, it is time to get informed. If we’re going to have to say goodbye to paper coupons, at least let’s fight for the right to pass on the reward points to whom we wish.
Take Control of Your Own Estate Planning
What you can do to address your digital assets in estate planning:
- Create a list of digital assets that if lost or missed upon your death, would be devastating.
- Write down your wishes or preferences for those digital assets. Read the Terms of Service from the digital custodians.
- Take that list to your legal adviser and discuss with them the best way to address these assets in your will and estate plan.
- Once your will and estate plan are updated, sit with your executor and have a conversation about your wishes.
If this list looks familiar, it should. These are exactly the same set of steps that are recommended in estate planning for your physical assets, such as your investments and bank accounts. In the digital age, the job of the executor just got a little harder because in all likelihood they won’t have a paper trail to follow.
More so now than ever, I would encourage all Canadians to get a will—and prepare their chosen executor to handle the added role of digital executor.
Sharon Hartung is the author of “Your Digital Undertaker: Exploring Death in the Digital Age in Canada.” Connect with Sharon at www.yourdigitalundertaker.com or on Twitter, @UndertakerTech.
Next, check out the ultimate guide to end-of-life planning.


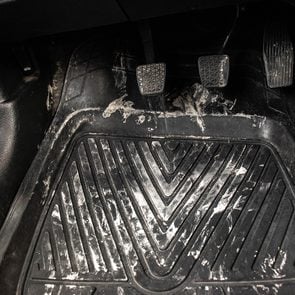
Ever wondered what happens if you put diesel in a gas engine? In short, it could cause serious damage—especially if you compound the mistake by starting the car after filling up. The good news is, it’s unlikely to ever happen to you, as diesel pump nozzles are too large to fit into standard gas tanks. However, if you ever find yourself in this situation, follow these step-by-step instructions.
If you fill the tank with the wrong kind of fuel and HAVE NOT started the engine:
- Don’t start the engine.
- Tell a gas station attendant what’s happened.
- Ask someone to help you push your car out of the way.
- Call a towing company so they can tow your car to a mechanic who will drain the fuel.
- If the fuel hasn’t been drawn into the engine, you may get away with no damage at all.
If you HAVE started the engine:
Things may be more difficult if you’ve driven the car, as the wrong fuel can damage your engine if it’s drawn through the system. Don’t start it again unless you have to, for example, if you’re in an unsafe position and have no one to help you push your car.
- Make sure you’re parked in a safe place.
- Make sure your ignition is off.
- Call your mechanic and the towing company.
- Call your insurer.
- A mechanic will need to drain your tank of fuel and you’ll probably need the filter replaced to protect your engine.
How it will affect your insurance:
Filling up with the wrong fuel is often classed as accidental damage with a comprehensive insurance policy. However, you need to check with your insurer whether they’ll cover roadside assistance and fuel removal.
Now that you know what happens if you put diesel in a gas engine, find out what these strange car noises could mean.


After you’ve finished with the loaf of bread following your morning toast, you probably seal the bag with that handy little plastic bread clip. But what happens if that bread clip goes missing, or (as is often the case after the loaf has been sitting in the freezer for a while) snaps in half?
According to this amazing video from TikTok user @goldilocks.bears.x, all you need to do is twist the open end of your bread bag as normal, but instead of securing the bag at the base of the twist, you’ll open the end back up and shimmy it back over the rest of the unused bread.
@goldilocks.bears.x#lifehack #lifehacks #hack #kitchenhacks #blowthisup #hinch #hinching #kitchenhack #fyp #hincher♬ Little Bitty Pretty One – Thurston Harris
I can’t believe I haven’t been doing this all my life!
More genius DIY food storage hacks
The wonderful thing about this hack is that you no longer need to worry about where you put that little piece of plastic! Watch the full video for more genius tips on how to seal up an opened box of cereal, and and an opened bag of chips. There’s something incredibly satisfying about these do-it-yourself food storage solutions!
If you’re looking for more handy TikTok hacks, we’ve got you covered. Find out how to peel potatoes quickly, a trick to store your eggs so they’ll last longer and the right way to put a new garbage bag in the trash can.


Get this: Your smartphone is 10 times dirtier than a toilet seat, according to microbiologists at the University of Arizona. Sure, many of these germs are harmless. But the researchers make a good case for learning how to clean your phone. After all, smartphone screens can also carry illness-causing bacteria like streptococcus and E. coli, as well as viruses like the flu. And while the Centers for Disease Control and Prevention considers the risk of getting COVID-19 from surfaces low, researchers have found the virus can live on surfaces for up to nine days.
“Phones are known points of contact where we’re constantly touching other things and then touching our phones,” says Melissa Maker, host of the YouTube channel Clean My Space. Like a good grasp of hand hygiene, an understanding of how to clean your phone will help you avoid various illnesses. That’s why Maker says the task should be a regular part of your cleaning routine.
Below, cleaning and tech experts share the scoop on how to properly disinfect your smartphone, which products you should use, and how often you should clean your device.
How to clean your phone screen at home
The average smartphone screen carries more than 17,000 types of bacteria, so experts recommend cleaning it every time you return home. Here’s how to clean your phone of bacteria and other germs:
- Power down your smartphone and remove the case. Germs can get caught in the corners of the case, so it’s important to take it off when cleaning, says Sarah McConomy, a smartphone expert and chief operating officer of cell phone trade-in site Sell Cell.
- If you have a screen protector that is pulling up on the sides or at the corners, bacteria can build up there, too, McConomy says. Remove the screen protector and throw it away.
- Gently wipe your screen with a microfibre cloth. For a deep clean, use an approved disinfectant wipe (more on those below).
- Don’t forget to clean the camera’s lenses and edges with a microfibre cloth. A sign yours needs cleaning? Your pictures will start to come out blurry.
How to disinfect your phone
If your phone needs more than a quick clean, you can disinfect it with the method below:
- Make sure your phone is turned off and the case is removed.
- With a cotton swab or similar product, scrub the grooves in your phone where grime might build up, such as the speaker grills, charging port, lock button, and earpiece.
- Gently wipe down your entire phone using a disinfectant wipe. Keep scrolling for options that are safe to use on smartphones.
- If there are any streaks left on your phone, use a microfibre cloth to buff and polish.
- Clean your phone case by running it under warm water or wiping it down with a disinfecting wipe. Leave the case and your phone in a clean area with plenty of airflow to dry.
- When your phone is dry, place a new screen protector over the screen. Then put the case back on your phone.
Can you use disinfectant wipes on your phone?
Apple has recently updated its guidelines for cleaning iPhones, saying that disinfectants like Clorox wipes are safe to use. If you don’t have an iPhone, Lysol wipes and other Lysol products are recommended for sanitizing electronics like smartphones.
Wondering how to clean a phone with Clorox or Lysol wipes—without damaging it? Gently wipe down the exterior surfaces. Avoid getting liquid in any openings, which could seep into your device and damage it.
Can you use alcohol wipes on your phone?
Alcohol wipes are approved by Apple’s experts for cleaning iPhones. For the best germ-busting results, the company recommends using 70 per cent isopropyl or 75 per cent ethyl alcohol wipes. Like Clorox wipes, alcohol wipes should only be used on outside surfaces to avoid damaging your phone. Don’t have an iPhone? McConomy says alcohol-based wipes can be used on any type of smartphone.
Can you use hand sanitizer on your phone?
Hand sanitizer contains ingredients like fragrances and rubbing alcohol that could harm your smartphone, so it’s best to avoid using it as a phone disinfectant. Another thing you’re doing that Apple experts wouldn’t: using heavy-duty household cleaners to clean your device. That’s a big no-no. “These solutions are so strong that they’ll damage your phone’s LCD screen as well as other intricate components of your phone,” says Kenny Trinh, CEO and editor of NetbookNews.
How often should you clean your phone?
Trinh recommends wiping down your smartphone with a microfibre cloth every day. “It might sound tedious, but it will only take a minute or two to do, just like handwashing,” Trinh says. He also suggests using microfibre cloths rather than tissues or paper towels to protect the screen from scratches. At the very least, you should give your phone a good cleaning twice a month, he says.
Now that you know how to clean your phone, find out why you need to stop charging your phone overnight.


Nonstick pans are a popular tool to have in your cooking arsenal because they’re so convenient. They don’t require the same maintenance as stainless steel or cast iron and are efficient for frying up just about any kind of meal. But what happens when a nonstick pan gets scratched and loses its nonstick powers? If yours isn’t too beaten up, you might want to try this TikTok hack that shows you how to restore a nonstick pan with salt.

What’s the Salt Hack for Fixing Nonstick Pans?
TikTok creator Sophie Louise (@s_lou92), who posts helpful cleaning hacks, shared a little-known salt hack for fixing nonstick pans on the popular video platform. As of publication, the video has garnered over five million views and over 600,000 likes. Louise begins the clip by explaining a quick trick to solve a nonstick pan’s sticking habit. “All you need to do is get some Fairy liquid and a soft sponge—never use a scourer—give it a wash and dry it up,” Louise said. “Fairy liquid” refers to a dish soap brand, so your go-to dish soap will do.
@s_lou92 Frying pan hack if it sticks. #LiftLockPop #moneysavingtips #cleaninghacks #deepclean #cleaningaccount #fryingpan #fyp #foryou #tablesalt ♬ original sound – Sophie Louise
After you’ve cleaned your pan, rinse and dry it off. Once it’s dry, place the pan on the stove and let it sit for a minute or so on high heat to get it hot (Louise says it should get “very, very hot” before you put the salt in). Once it’s ready, pour enough table salt to cover the bottom of the frying pan and shake it, so the salt is evenly distributed. Let the salt cook in the pan for a couple of minutes until it gets golden brown. Louise describes the colour as “a bit like brown sugar.” Once the colour looks right, you can dump the salt into the sink—Louise notes it can be a helpful cleaning method for some sinks—or the trash. Next, take a damp paper towel and wipe the pan out. (Obviously you’ll want to let the pan cool down first.)
Now that you’ve completed the hack, you’re ready to cook something. In the TikTok video, Louise cooks an egg with some oil in the pan to demonstrate that the pan, which “used to stick,” doesn’t any longer.
I Tried It—Here’s What I Thought
I had a nonstick pan with scratches that no longer worked well. Before trying this hack, I avoided using the pan for frying eggs or food that was more likely to stick, such as fish or burger patties. To begin, I washed and dried my pan as the clip instructed. I was pretty skeptical that some hot table salt would do anything, but I went in with an open mind and heated my skillet. I turned my burner on high and waited a few minutes for the pan to heat. I knew it would be hot to the touch by sprinkling a few water droplets into the pan and watching them quickly sizzle.
I poured a very generous amount of salt into the bottom of my pan and shook the pan until the salt looked even. As Louise mentioned in the video, it takes a few minutes of cooking for the salt to turn a golden brown. Once it was unmistakably the colour of light brown sugar, I removed the pan from the heat and disposed of the salt.
Eggs used to be the stickiest food to cook in this pan, so I put a small amount of butter (about a teaspoon or two) into the pan and cracked an egg to test it out. My initial expectation was that the egg would still stick to the pan. It didn’t slide around while cooking and looked stationary. However, I could easily lift it out of the pan once it was done cooking.
The same day, to test it out again, I cooked three burger patties (one Beyond Meat and two turkey patties) in the pan. There was no doubt about it—the table salt hack worked! My pan was a pain to cook with; now it does its job. While I’m not going to say that the pan works perfectly every time, it is better than before and appears to have improved.
I don’t believe that the salt hack for fixing nonstick pans will work for every stubborn nonstick pan out there, but if yours has mild to moderate scratches, give it a try and see if it helps!
Next, find out the best way to clean cast iron pans (if you want them to last forever).


In a climate like Canada’s, there’s really no such thing as an “all-season tire.” Because temperatures can swing wildly from frigid winters to scorching summers, your vehicle needs two sets of tires made from two different rubber compounds: one designed for freezing temperatures, and another better suited to hot asphalt. Using the wrong tires for the season can compromise your safety, and cost you in the long run.
When to Remove Winter Tires
The vast majority of Canadian drivers own a set of winter tires, and aside from being mandatory in some provinces, it’s a smart decision. Because they don’t stiffen in the cold the way regular rubber does, they’re able to maintain their grip on the road, while their deep tread design channels snow and slush so that it shoots out behind the wheel instead of building up on the tire’s surface. Some winter tires are also covered with a sponge-like compound that removes the thin layer of water over ice that can cause slippage.
Knowing exactly when to remove winter tires is a bit more specific than “spring.” It’s once daily highs stay consistently over 7° Celsius that it’s time to put your winter tires into storage, says Gabe Scavone, owner of OK Tire Weston, an auto service centre in North York, Ontario. That temperature is the threshold at which the soft rubber that gives winter tires their traction in cold starts to have the opposite effect in heat—it wears out faster, and becomes squishier and more slippery.
“In the summer, winter tires have a braking distance 26 per cent longer than all-season tires,” says Scavone. “Because all-season tires are made of stiffer rubber, that aids in handling—your ability to corner, accelerate and brake—and your vehicle’s responsiveness in cases where you need to perform an avoidance manoeuvre.”
In heavy rain, the tread design that helps winter tires grip snow can become a liability. “Because winter tires don’t evacuate water as effectively as they do snow, there is actually an increased risk of hydroplaning in summer,” says Scavone. This happens when tires can’t disperse water quickly enough to maintain contact with the road, causing the car to slide across the wet surface.
It Can Save You Money, Too
Although buying two full sets of tires may seem like a big expense, it can actually save you money in the long run. Since winter tires wear down faster when used in summer, they’ll need to be replaced more frequently, and the worn treads won’t maintain traction as well by the time next winter rolls around. Switched at the appropriate intervals, a set of winter tires should last six seasons, according to most manufacturers, while a set of all-season tires should last up to 100,000 kilometres.
With gas costs on the rise again, switching to all-season tires in warmer months can save you at the pump, says Scavone, owing to their shallower treads and closer contact with the road. “In addition to being quieter, all-season tires have a decreased rolling resistance, which means it takes less force to move the tire,” he says. “This translates to greater fuel efficiency and lower gas costs.”
Did you goof and forget to switch out your winter tires last year? (No judgment here.) Your tires may not be ruined—at your next service appointment, ask to have them inspected and measured with a professional tread depth gauge, says Scavone. Depending on the model and date of manufacture, they’ll be able to tell you how much life your tires have left. According to Transport Canada, if your treads are worn to 4mm or less, the tires will need to be replaced next winter.
Now that you know when to remove winter tires, check out nine strange car noises—and what they could mean.


1. Wipe Down the Outside of Your Range Hood
The first step in how to clean grease from a range hood and return it to shiny-as-new respectability is to wipe down the outside, where the grease has landed and dust settled in. Use thick paper towels or your best rags to really clean this section up. To make sure you break up the amalgam of grease and dust, use an anti-grease dish soap. Mix a little of it with warm water (you can fill your sink with this mixture if you are planning a big cleaning project) and thoroughly wipe down the hood. Finish up with a basic multi-purpose cleaner spray and some paper towels to clear away leftover residue.
Note: If you buy a special cleaner that’s designed to cut grease or use another household chemical that’s claimed to remove greasy stains (some people suggest acetone, for example), always find a small corner of your range hood and test it first. These very powerful grease destroyers can also harm finishes or the surface appearance, so make sure they are safe to use. (For a similar reason, here are eight surfaces you should never clean with vinegar.)
2. Clean Away Any Stains on the Underside of the Hood
Now it’s time for the underside of the hood, around where the vent is installed. If it’s been a while since the hood was cleaned, this spot may be a blackened mess. It’s a good idea to switch to a scrubbing brush to tackle any large grease or ash deposits here. Gas ranges tend to get especially dirty in this area.
Some people like to use OxiClean for these stains, and if you have any around it’s a great product to start with. Otherwise, try a grease-cutting dish soap and a pan filled with a mixture of warm water and baking soda. For bad build-up, turn the baking soda into a paste and apply it to the underside of the hood, then wait for half an hour or so: Baking soda is famous for neutralizing acidic compounds and can break apart some of the bonds holding grease in place. (Find out more brilliant uses for baking soda all around the house.)
Remember to wipe regularly with clean rags or paper towels to remove the layers of grease, and finish up with a gentle cleaning spray. This strategy also works well for the inside of your oven, although avoid toxic cleaners that can cause fumes. (Here’s a little-known trick to cleaning your oven without scrubbing.)
3. Take Out the Filter and Clean It
The filter gets the brunt of the grease in your range hood, and it needs to cleaned carefully. Remove the filter first—most have a metal loop that allow you to pull it out. If you don’t want to get greasy, wear gloves for this part!
Fill your sink with hot water (the hotter, the better, although you don’t want to burn yourself while you work). Add around a teaspoon of anti-grease dish soap and about ¼ cup of baking soda to the water, and then fully submerge the filter.
Let the filter soak for 15 to 20 minutes, then get your scrubbing brush and tackle the filter with firm brushing strokes: Don’t use too much pressure, which could damage the filter, but don’t be afraid to be vigorous. Drain and refill the sink with new soapy water as needed. When the filter is clean again, rinse it off and dry it thoroughly with a cloth.
Now that you know how to clean grease from a range hood, check out 13 cleaning hacks that take the hassle out of housekeeping.


Thor came to us with the name Sterling, but it didn’t suit him. While Thor is of course the Norse god of thunder, we named him after the Chris Hemsworth character in the Marvel movies. With his long blond mane and playful attitude, it just seemed to fit. He’s got the wiggliest upper lip I’ve ever seen on a horse, and he uses it to nuzzle and dig through pockets.
This 20-year-old Haflinger horse is my pandemic pony, the fulfillment of my childhood dream of having my own horse. He is also the best thing that has ever happened to me. I apologize to my dear husband, Dave, when I say that.
We board Thor at a barn roughly 25 minutes’ away by car from our home outside Elmira, Ontario, where he shares a grass-free paddock with two other horses. The Haflinger horse breed originated in the mountains of Austria and northern Italy, where they lived on scrubby mountain grasses. To help keep him at a healthy weight despite the richer grass he grazes on here, we feed Thor mostly hay—though he does get the occasional apple or peppermint.
Thor is very different now from when I first got him. Back then, he was so sour and nearly unrideable. I read that Haflingers are notorious for needing time to warm up to new owners, so I continued doing groundwork with him, such as walking by hand. Over time we developed a mutual trust.
Initially, I had no intention of doing much more than plodding around the neighbouring fields with him. I’m a middle-aged rider, coming back to horses after a 26-year break due to back pain. But once I was regularly riding again, I built up some core strength, which helped with my back.
I soon realized that Thor had the potential to be much more than just a trail horse for me. For example, he absolutely loves jumping (so do I), and I’ve entered him in a couple of shows. I’m so proud of him and how far he’s come.
I’m grateful to have found my way back to riding.
Next, check out 30 majestic horse pictures from across Canada.


Winnipeg’s Murray Dufton could muddle his way around a computer. The 75-year-old often used one as a project manager in northern Manitoba. But since he retired, he couldn’t quite keep up with rapidly changing technology. In early 2021, he spotted an e-newsletter in his inbox from a local community centre. Connected Canadians, an Ottawa-based organization that went national during the pandemic, provided senior citizens with tech help from volunteer mentors. To Dufton, it sounded like a great opportunity.
Emily Jones Joanisse and Tasneem Damen decided to start Connected Canadians in 2018. The pair of friends found it rewarding to help the seniors in their lives overcome tech challenges. Jones Joanisse, who is director of experiential learning at Carleton University’s Innovation Hub, and Damen, an independent software architect, wondered, what if they could scale that support? “Our goal is to teach seniors how to search for information and to learn,” says Jones Joanisse, “and then to become confident in their ability to pick up new technology skills on their own.”
Canadian seniors are increasingly using newer technologies, with the majority now owning a smartphone and using the Internet daily. Since much of our lives are lived online—from shopping to social catch-ups to doctors’ appointments—a person without the savvy to navigate it can quickly feel isolated. Tech use has only increased since the pandemic. A 2020 survey by Environics Research showed 23 per cent of seniors now make video calls on their smartphones, twice as many as in 2019. Seniors’ use of social media is also on the rise. About 72 per cent of those over 65 also said they felt comfortable using current technology.
Jones Joanisse and Damen would like to see that number go even higher, and among older seniors, too. Many who ask them for help are in their 80s; the oldest person the group has assisted is now 102. There’s no limit on the number of sessions a senior can access. Common questions include help figuring out a new phone, solving printer problems, connecting on Zoom and setting up email. The organization’s coaches have grown from Jones Joanisse and Damen, who still volunteer today, to nearly 100 active mentors.
“Most people would roll their eyes and glaze over and say, ‘Oh no, not another old person!’” says Dufton. But in 10 video-call sessions, he learned how to synchronize his iPad, computer and smartphone, plus how to better save and organize his files. One big reason why Connected Canadians has been so successful, adds Jones Joanisse, is that they encourage their mentors to respect and care for the senior, and not treat them like a five-year-old. Mentors are trained to imagine they are helping the elderly mother or father of their boss—and to remember that each senior has plenty of life experience.
Kate Oakley, 70, of Ottawa says she started having tech trouble when she “tried to come into the 21st century.” A retired researcher who now dedicates much of her time to creating artwork, Oakley owned an Amazon Echo. She wanted to use it to play music and keep track of her grocery list. She compares Connected Canadians to going to the library. “You have a knowledgeable librarian, and they guide you to the right path,” says Oakley. “They don’t do it for you, but they help you fix it yourself, so you aren’t always dependent on them.”
Today, she confidently gives a command to her Amazon Echo, and jazz fills the room. That’s how she now starts most days, with what feels like an endless stream of music, tailored to her very own taste.
Next, find out if Canada’s 3G network shutdown will affect you.