lt;strong>Do_ahead:
These_scones_are_best_served_immediately,_but_they_can_be_stored,_covered,_at_room_temperature_for_up_to_12_hours_or_in_an_airtight_container_in_the_refrigerator_for_up_to_2_days,_then_warmed_in_a_325°F_(160°C)_oven_for_5_minutes_
Excerpted_from_
lt;strong>Do_ahead:
You_can_make_these_cookies_ahead_and_store_them_in_an_airtight_container_at_room_temperature_for_up_to_2_weeks__They_can_be_frozen,_in_an_airtight_container,_for_up_to_2_months__Thaw_them_uncovered_at_room_temperature_for_an_hour_before_serving_
Excerpted_from_
Our family has an Easter egg tradition that goes back three generations. If there was a recipe to follow, it would read something like this:
On Good Friday, take three dozen eggs and place them in a stockpot of cold water. Slowly bring the water to a simmer and leave the eggs until you are sure they are hard-boiled. Drain and cover them with cold water. Then set them on a towel to dry.
Once supper is cleared away, set out a number of cups, fill them half full of cold water and add a tablespoon of vinegar. Carefully drop one dye tablet into each cup.
By the time this is done, the little ones are dancing around with excitement because now is the time to colour the eggs!
We are not a family known for our artistic abilities, but each one does his or her best to make an egg that is pleasant to look at. We use wax crayons to make dots, zigzags, crosses, rainbows, butterflies or the logo of someone’s favourite sports team.
If you’re only two or three years old, there may be only squiggles. Once the drawing is done, the egg is carefully lowered into one of the cups of dye. When it comes out there are lots of oohs and ahhs.

Of course there are mishaps. Sometimes, a little one squeezes the egg too hard and it cracks. Other times, an egg may slip out of eager fingers or drop too hard into the cup. No one worries about the dye getting into the egg because it is food colouring.
Once all the eggs are coloured, they are placed in cartons in the fridge to wait for the Easter Bunny to hide them. On Saturday night, when the children are asleep, the Easter Bunny hides the eggs along with some chocolate treats.
Easter morning is full of excitement as the children rush around to hunt for eggs and put them in their baskets. Once they are all found, they are given to Mom and Dad. The kids love colouring and hunting, but they don’t like to eat them.
My husband’s family had a tradition where they would pop the wide end of the egg on their unsuspecting sibling’s forehead. You had to be quick to do it and, when they were teenagers, it was a lot of fun for our daughters to see if they could catch their dad. I often think that traditions are like cement in that they help hold families together.
As the years go by, the children will remember sitting around the kitchen table decorating eggs with their parents and grandparents. Hopefully, they will draw on the love that was felt. Maybe when they become parents themselves, this tradition will continue to the fourth generation.
Next, read up on 10 fascinating Easter traditions from around the world.


I used to be fit. Almost—dare I say—sporty? I ran, played tennis, did Pilates, rode my bike everywhere and actually used my gym membership. But thanks to a mounting list of injuries and the creaky indignities of middle age, the most vigorous workout I do these days is walking around the block or stretching in front of the TV. But when I came across a big European study touting the benefits of chair yoga for seniors, which included better overall physical health and even strength building, I decided to try it (even though I’m not technically yet a Golden Girl.) Doing yoga for 15 minutes a day—unlike the intense ashtanga yoga that I used to do for TWO HOURS (!?) in another life—seems right about my speed these days.
What is Chair Yoga?
Chair yoga involves poses like twists, hip stretches and bends that are modified to be done while sitting on your tuchus on a chair (or, sometimes, standing while using the chair for support). While one of its major benefits is that it can improve your sense of proprioception (knowing where your body is in space, which helps prevent falls), I quickly discovered that it’s also a handy body break for desk-bound workers—and there are specific regimes for rehabilitating injuries like Achilles tendonitis or knee issues. It may not be TWO HOURS (!?) of ashtanga yoga, but all the evidence around moving your body versus not moving your body says that something is always better than nothing, and there’s nothing I like in an exercise regime better than low expectations.
Michael Hutkins teaches chair yoga at retirement homes in Quebec and Ontario and also trains other instructors to lead chair-based classes. He says that in addition to all of the practice’s physical benefits—including lubricating your joints and improving digestion by moving, and preventing repetitive injuries through wrist and finger exercises—the biggest benefit can be mental.
“When you breathe easier your mind also calms down,” he says. “That helps you with things like anxiety and negative emotions or stress over things you can’t control.”
Finding the Right Routine
I queue up one of the approximately 500 million chair yoga videos on YouTube (try Gentle Chair Yoga by Cara Kircher, or her Intermediate Chair Yoga routine if you’re feeling tough.) The 10-minute routine—what? I don’t want to overdo it!—is a combination of slow movements that I personally refer to as “Memories of Yoga.” In each position my body remembers all that yoga I used to do 15 years ago. Which isn’t to say it’s not challenging—I’m mortified to discover that it is—but that I instantly know what pose the chair version is modifying. And while I probably couldn’t get through a regular yoga class anymore, this way I still get to experience some of the sense of focus and accomplishment of being in that yoga “flow.” I do 10-20 minutes each day for about a week, and because it’s not too high energy I can even do it in that annoying dead time in the evenings when I’m too tired to work but I can’t settle into a TV show because my kid isn’t in bed yet.
I don’t hate it. Chair yoga probably isn’t going to turn me into a hard-bodied gym bunny, but I notice that my neck and shoulders—constantly sore from staring at a computer—become less tight, and it’s also surprisingly useful for helping my mood. It’s almost like mentally changing the channel—even for such a short period of time—resets my grumpy brain from a state of stomping around to one of just irritated sighing. I’ll take it.
Now that you’re familiar with chair yoga, find out what happens to your body when you start walking 10,000 steps a day.


How to Handle Stress: 5 Healthy Habits Worth Adopting
Eat well
Toronto naturopath Pamela Frank recommends eating protein with each meal to keep blood sugar levels stable, cutting down on caffeine, restricting your intake of refined sugar. There are also vitamins and supplements you can take to improve brain function, nourish the adrenal gland’s ability to cope with stress and anxiety, and increase the body’s production of serotonin, which affects mood. Frank recommends B vitamins, fish oils and magnesium supplements. (Check out more foods to boost your mood.)
Move more (but at the right time)
While regular exercise is a great way to combat stress, try to work out midway through rather than late in the day; too much stimulation close to bedtime can affect your ability to sleep, Frank says. If you’ve ever felt that “runner’s high” that people describe, it can be explained by your body’s release of endorphins, which help to reduce anxiety, improve your mood and even create a sense of euphoria.
Identify triggers
While it often isn’t possible to eliminate stressors altogether, there are ways to cut back on stress. To begin, you need to identify what is causing stress in your life, and then look for ways to reduce them. For instance, you likely can’t quit your job altogether, but perhaps you can cut back on the hours you work, or negotiate a more flexible work schedule with your boss.
Try relaxation techniques
Relaxation and breathing exercises, yoga, mindfulness meditation, Tai Chi, prayer and even massage are also useful ways to cope with stress. Mindfulness meditation can be particularly helpful, says cognitive behaviour therapist Kim Wickwire, because it helps you to “cultivate an ability to watch your thoughts in a detached way and discern what’s worth your attention” rather than simply worrying about everything.
Need to de-stress, but don’t have the time? Take one minute for yourself; close your eyes, breath deeply and focus on your pulse and the blood rushing through your veins. That one minute will help you take your stress down a notch.
Consider psychotherapy
When learning how to handle anxiety, a therapist can provide added support, help you to develop insight into your problems and come up with your own solutions. When looking for a therapist, keep in mind that a trusting relationship is often even more important than the type of therapy you choose, according to stress relief consultant Ronnie Nijmeh.
Of the approaches that do exist, cognitive behaviour therapy is considered by many experts as the best way to treat anxiety because of its focus on coping strategies and on identifying and changing negative thoughts and beliefs, says Wickwire. While antidepressants are sometimes also prescribed to cope with extreme anxiety and the depression that often accompanies it, medication tends to be more successful when used in combination with psychotherapy.
Now that you know how to handle stress, check out 10 mental health podcasts worth adding to your playlist.


Most people know about the lint trap on their dryer and make sure to regularly clean it out. But did you know that your washing machine has a similar filter that should also be cleaned just as often? A washing machine’s filter traps anything from lint to loose hairs, and should be kept clean to keep your washing machine functioning properly. In order to clean a washing machine’s filter you first have to know where it is.
Where is the washing machine filter located?
The quickest way to locate the filter on your machine is by consulting its owner’s manual. If you no longer have access to the owner’s manual, here are a few places to look for the filter:
- In the front of the unit behind a small hatch
- At the end of the drainage hose.
- Under the cover of your centre agitator.
- Along the top rim of the drum of your washing machine.
Still no luck? It’s possible your washing machine does not have a filter at all. Most newer, high-efficiency washers rely on a filter in the pump that self-cleans, meaning that there’s no need for maintenance on your end.
Check out 13 washer/dryer problems you should never ignore.
How to clean a washing machine’s filter
A combination of detergent, dust, hair and lint can clog up a filter pretty quickly. A clogged filter limits the washing machine’s efficiency and can also lead to more lint deposits on clothes as well as poor drainage.
The quickest way to clean out your filter is to remove it from the unit and soak it in hot water, loosening any clog or trapped residue. If the filter cannot be removed, clean it out with brush. Some filters are disposable, so instead of cleaning them you can just throw them away and put a new one in place.
Next, check out 13 cleaning hacks that take the hassle out of housekeeping.


A century ago, you needn’t travel far to find unique fruits or vegetables. Their names—be they Lakota squash or Aunt Astrida’s Latvian oxheart tomato—were a reflection of people and place. Today, because of the widespread adoption of industrial farming practices, about 90 per cent of North America’s fruit and vegetable varieties have become extinct. Worldwide, 75 per cent of crop diversity has been lost. With that goes resilience against pests and future weather patterns, not to mention delicious flavours. But a group of Canadians have taken crop diversity into their own gardening gloves.
The rescue mission started in the early 1980s with 100-some backyard gardeners scattered across B.C., Ontario and Quebec. Every year, they noticed more of their favourite plants disappearing from the seed catalogues. Big seed companies were buying up smaller ones, and as inventories were consolidated, beloved beans and broccolis vanished into obscurity. To keep their cherished varieties circulating, the gardeners decided to save and share their own seeds. Soon 1,000 of these guerrilla growers were mailing seeds across the country.
Seeds of Diversity
In 1995, these gardeners formed Seeds of Diversity, a nonprofit focused on preserving Canada’s botanical heritage. A little over a decade later, the group launched the Canadian Seed Library to house each crop variety in circulation. “We designate buildings to be preserved. We designate landscapes to be preserved,” says Bob Wildfong, the executive director of the organization for two decades. “We need to think of old varieties of plants as being in that same category.”
The Seed Library now stocks more than 2,900 seed varieties, stored in a closet at the nonprofit’s office in downtown Waterloo. A second backup library is stored in a walk-in freezer at an educational farm north of Guelph called Everdale, where Wildfong started a seed-growing program in 2007. To keep the library well stocked, Seeds of Diversity also operates an adopt-a-seed program; members pay between $50 and $250—the cost of full sponsorship—to induct a specific variety into the seed library for perpetuity.
Under the program, volunteers sign up for spring growing, and tiny manila envelopes are mailed to each taker; the scarcest seeds are sent to the most experienced gardeners. At the end of the growing season, packages of fresh seeds are shipped back to Waterloo for drying, weighing and testing, before going into storage.
Wildfong’s current favourite seed is the purple striped pole bean, an old Mennonite variety from the Waterloo area. He says the humble bean signifies something he’s found most beautiful about seed saving: the personal connections between people and families. “I’m growing this Mennonite bean, and it’s not from my family,” Wildfong says. “But now it’s part of my life, and I would like someone else to adopt it so it becomes part of their life, too.”
Laurie Graham, 46, and her mother, Wilda Bostwick, 76, might do just that. They’ve already sponsored the Croatian blue pole bean, plus the year-round lettuce, the Slocan pea, and the white Sokol breadseed poppy. Graham, who lives in Toronto, started seed-sponsoring in 2012 as a gift to Bostwick, who grew up on a family farm and now lives in Vancouver. Graham first chose a sugar snap pea, like the ones her mom used to grow when Graham was a child. When the next holiday rolled around, Bostwick reciprocated, and a new tradition was forged.
Graham says it’s meaningful to do her part in helping bring seeds back from the brink. “People work together to get seeds into a more viable state,” she says. “It’s a partnership.”
Check out more good news stories to brighten your day!


Does anything really beat leftovers? Let’s be honest, almost everything tastes better the next day (although you should exercise caution with these leftovers that could make you sick). For most of us, the easiest way to reheat leftovers is in the microwave—and unfortunately, that rarely goes according to plan.
From cold spots to soggy rice, microwaves are somehow both our best friend and worst enemy when it comes to leftovers. But as per usual, TikTok has come to the rescue to show us how to properly use a microwave!
How to Reheat Leftovers in a Microwave
TikTok user @howdoesshe gave us this ingenious hack to evenly warm everything from pasta to rice dishes. Instead of dumping your leftovers in a pile in a microwave-safe container, you need to spread them out in a ring, leaving plenty of space in the middle. This prevents cold patches and uneven warming, giving you sizzling hot food in a minute or two!
@howdoessheChange the way you microwave! So simple! #lifehacks #momhacks #kitchenhacks #cookinghacks♬ Blue Blood – Heinz Kiessling & Various Artists
Reheating All Your Leftovers the Right Way
While this trick works for rice, pasta or grain-based dishes that can be spread out, you might be wondering how to reheat pizza, chicken or even egg-based dishes like quiches. We’ve got you covered with 20 handy microwave tricks for making sure you get the most out of your reheated leftovers.


My mother, Joan Hayman-McMechan-Stanton-Vladicka was one of the strongest people I have ever known. She was resilient, funny, stubborn and dedicated to everyone she loved. These qualities helped her get through the many hardships she experienced.
Born and raised in Montreal, she was 12 when polio invaded her home, claiming the life of her older sister Viola and leaving a permanent mark on both Mom and her younger brother. My mother worked hard to fight against the doctor’s prognosis that she’d never be able to walk again. After six long months in the hospital, she was stubborn and strong enough to walk down the stairs and go home. She was lucky and she knew it.
Mom started working as a secretary for Canadair in Montreal when she was only 19. She often told us stories about the adventures she had with the “boys” she worked for. She loved that they treated her as an equal and included her in their conversations about planes and flying. Instead of accepting payment for overtime hours, she traded those hours for flying lessons.
Mom joined the Canadian Flying Club (CERA) in September 1954 and received her student pilot permit from the Canadian Department of Transport in October that year. Upon completing her course with this club, she became the first woman to fly solo for Canadair. A year later, on September 9, 1955, Mom had logged enough hours to receive her private pilot’s licence for single-engine planes. She wanted to go on and get her commercial pilot’s licence but that was not to be. Mom loved her time in the air. She’d often describe it as dancing in the clouds. Being a rebel, she loved how it was so bewildering to some that she chose to do this. But she didn’t care what others thought; to her it was amazing and something she was very proud of.
Mom passed away on October 3, 2017. Just a week before, we had been talking about the last time she had piloted a plane—a Cessna—on her own back in 1980, and how she never did go up again. She laughed about it but I could hear the regret in her voice. After Mom was gone, I wanted to do something special for her. I went back and forth trying to decide what it was I could do. Nothing seemed right but I kept remembering our conversations about her wanting to go back up in the sky. I finally realized that would be my goal. I’d take some of Mom’s ashes up and let her have one last dance.

With the help of my cousin-in-law Bernie, who is a pilot himself, my husband David and I set a date to go up—my dream was going to come true.
Leading up to the flight, my emotions were all over the place—doubt, fear, sadness and joy, all the emotions you could imagine. The morning of April 20, 2019 dawned clear and cool. The rain had been relentless and I was worried we would have to cancel. Driving out to the airport, I was quiet, still nervous about whether this was the right thing to do or not. It was like letting her go all over again and I kept asking myself if I could. I knew Mom would be thrilled, but was I strong enough to do this for her?
Taking off is not my favourite part of flying, much to my mother’s surprise. This day, though, I was grinning, filled with an excitement I’d never felt before. We circled around, looking for some cloud heads and when we found a formation close to the greenhouse she loved, I snuck the window open a crack. Within a piece of a colourful Easter napkin she’d given me was now a pinch of her ashes. I took a deep breath and with her laughter in my ears and a massive grin on my face, I let Mom have her last dance among the clouds. I knew in that moment that I’d done the right thing.
Although I miss Mom very much, I see her smile in the mirror, hear her laughter in my ears and feel her love giving me strength every day. I’m so thankful I was able to give her one last dance. Every morning I look up at the clouds and tell her that I love her and miss her—and to keep dancing.
Next, read the heartwarming story of a mother’s love remembered.


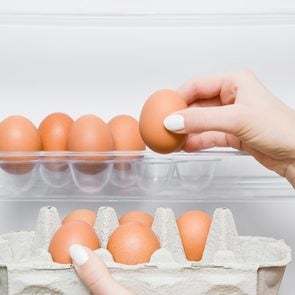
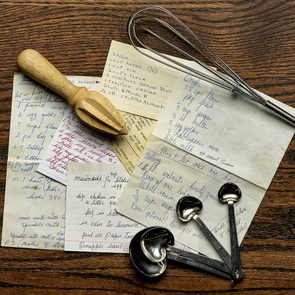
There’s nothing we enjoy more than a good TikTok hack. Things have gotten so much easier since we’ve learned to store eggs the right way, make perfect microwave mashed potatoes and whisk like a professional chef. This week, we discovered that we’ve been putting garbage bags in the wrong way. Seriously.
The Right Way to Use a Garbage Bag
Is there really a right way to get the garbage bag in the can? There is, according to TikTok user @ch0zi and the 3 million-plus people who have watched this hack.
@ch0ziBro. Who knew?? Garbage bags have an inside out mode?? Lmaoo. My life is a changed♬ Coming of Age – Blondes
It’s super simple. Start by opening the bag. There’s no need to shake it out and make all that fuss. All you need to do is place the opened drawstring edge over the top rim of the garbage can—like a hat. Then you push it down inside the can, removing all the air and making room for the trash.
Sure…the end result is pretty similar to the way you’ve been doing it for years, but there are two noticeable differences. First, trash bags actually come inside out. Don’t believe it? Check out the seam the next time you take one out of the box. This method flips your trash bag right-side-out. Second, you avoid the annoying (and often noisy) hassle of shaking out a new bag. Sleeping babies everywhere will thank you.
Now that we know this nifty trick for lining garbage cans the right way, find out why you should drill holes in your garbage can.