DIY Truck Repair
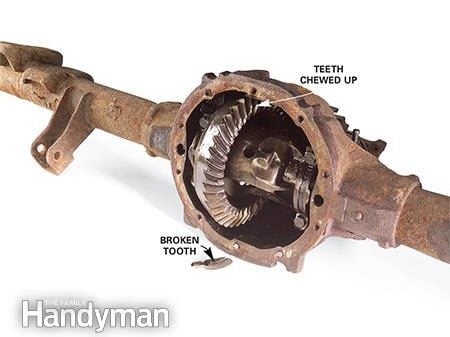
If you have a pickup truck or an SUV, here are a few maintenance tasks you can do yourself to prevent expensive repairs. First, we’ll show you how to change the oil in two often-neglected members of your power train: the differential and the transfer case. If you skip this maintenance, you may end up with an expensive ($2,000) metal-to-metal experience (see photo to the left). Do it yourself on a Saturday morning and save $150 in shop charges.
Second, we’ll show you what to do when you flick the switch to engage your four-wheel drive and nothing happens. You likely need a new shift motor, and believe it or not, replacing it is easy.
And finally, you’ll learn how to fix that stupid tailgate that either won’t open or latch shut.
Required Tools and Materials for this Project
Have the necessary tools for this DIY project lined up before you start – you’ll save time and frustration.
• Socket/ratchet set
• Caulk gun
• 4-in-1 screwdriver
• Adjustable wrench
• Putty knife
• Rags
• Safety glasses
• Torque wrench
• Disposable gloves
• Oil drain pan
• Suction gun
• Differential oil, gasket and sealer
• RTV sealant
• Transfer case fluid
• Transfer case shift motor
• Lithium grease
Changing Oil – Step 1: Drain the Oil
Start by locating the stamped metal ID tags on your front (four-wheel drive) and rear differentials. Write down the codes and take them to the dealer or auto parts store. The parts people need the codes to select the right gasket, sealer and oil for your differential. The ID tag also helps them determine whether your differential is the “limited-slip” type, which needs a friction-modifying additive. Limited-slip differentials transfer power to the opposite wheel if one spins. The friction modifier makes the mechanism work smoothly. While you’re shopping, also pick up a “suction” gun to inject the new oil and a tube of RTV (room temperature vulcanizing) sealant to reseal the gasket or form a new one.
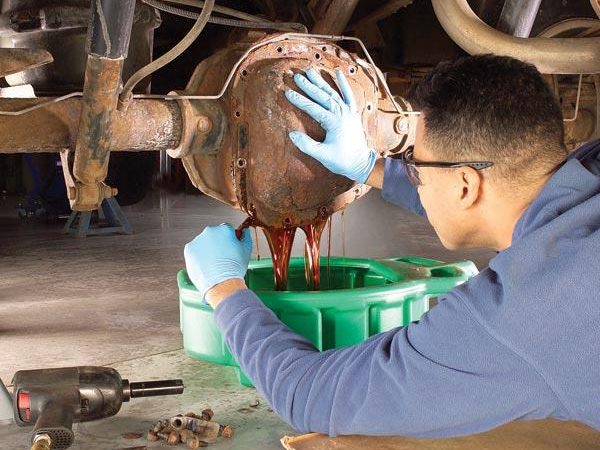
Raise your truck and support it with jack stands. If your differential is equipped with a drain plug in the cover, you can simply remove the plug and suck out the old lubricant with a suction gun. However, most newer-style differentials don’t have a drain plug and you must remove the cover to drain them. Place a drain pan under the differential and remove the cover bolts, starting at the bottom and working toward the top. With the bolts out, hold the cover while you gently tap it with a rubber mallet or pry it off with a gasket scraper. Once the oil has drained, use paper towels to soak up any oil pooling at the bottom of the differential case. Don’t spray the inside of the differential with any type of cleaner – it can damage seals and clutches and wash away critical start-up lube from gear and bearing surfaces.
Changing Oil – Step 2: Add RTV Sealant
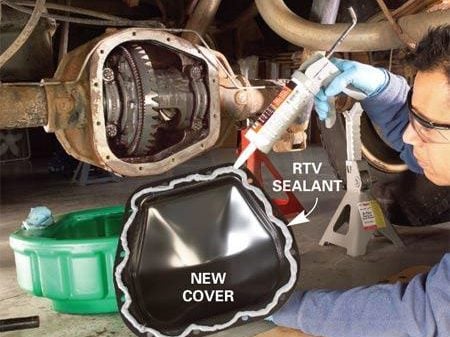
Use a gasket scraper or putty knife to remove the old gasket or RTV sealant from the housing and cover mating surfaces. Do a final cleanup by spraying a paper towel with aerosol brake cleaner and wiping off any traces of oil from the mating surfaces.
Then apply a thin coat of RTV sealant to the differential and press the gasket into place. Install the cover and torque the bolts. If your vehicle calls for RTV sealant instead of a gasket, apply a generous bead on the cover, making sure the bead surrounds the bolt holes.
Changing Oil – Step 3: Tighten Bolts
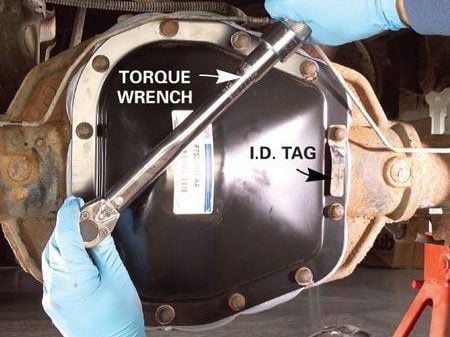
Quick-curing RTV “skins” over in as little as 15 minutes, so apply the cover and torque the bolts right away. Overtightening the bolts can squeeze out all the RTV and result in leaks, so use a torque wrench. Proper bolt torque is critical to maintaining a good cover seal. To find the bolt torque specifications for your vehicle, consult a shop manual or use an online repair manual (search for “online repair manual” for your truck or car model).
Changing Oil – Step 4: Add New Oil
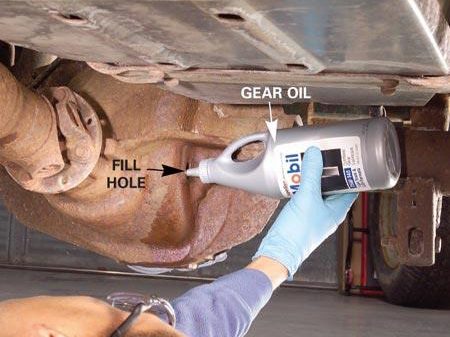
Read the directions on the RTV package to determine the minimum “curing” time before refilling with fresh oil. Once the RTV has cured, refill the differential to the right level (refer to a shop manual). Always add the friction modifier first and then top off with the gear oil.
Changing the Transfer Case Oil (Four-Wheel Drive Only)
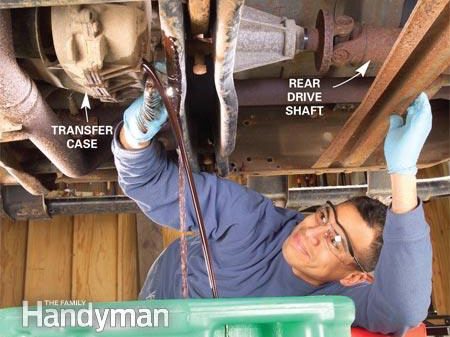
The transfer case is located at the rear of the transmission, and its job is to “transfer” power to the front and rear drive axles when you shift into four-wheel drive. But the gears inside the transfer case spin even when you’re in two-wheel drive. So it’s important to change the oil on schedule, even if you don’t use four-wheel drive very often.
Place a drop cloth and drain pan in the area under the transfer case before you remove the drain plug – this can be a messy job. The drain plug on this Ford truck has a recessed 3/8-in. square hole. To remove that style plug, simply insert the end of your ratchet and loosen. Other manufacturers use hex-head drain plugs. Use a six-point socket for that style.
Changing Transfer Case Oil: Refilling the Transfer Case
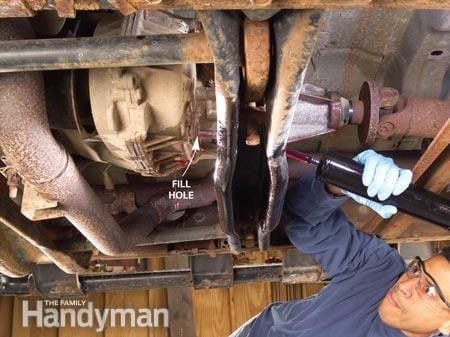
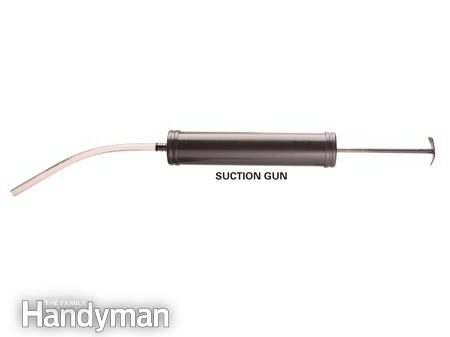
To refill the transfer case, use a funnel with a flexible spout or buy an inexpensive suction gun (see next slide) to inject the fresh fluid. Check your shop manual for the type of fluid to use and the proper fill level. Torque the drain plug to specs when you’re done.
Changing Transfer Case Oil: What is a Suction Gun?
Use a suction gun to inject fluid in tight spaces.
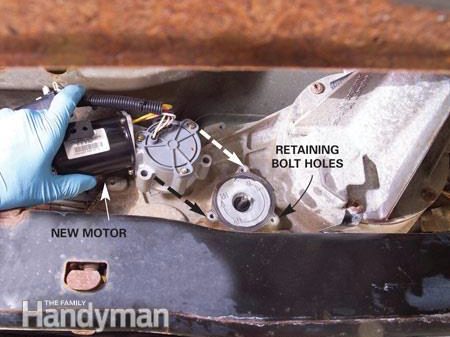
Replacing a Transfer Case Shift Motor
If your four-wheel-drive truck shifts electronically (push button or dial), the shift motor does the work of moving the gears into and out of 2-WD, 4-High and 4-Low. When the shift motor fails, your transmission will be stuck in either two- or four-wheel drive.
Diagnosing a shift motor problem is easy. Refer to a shop manual wiring diagram and follow the procedure for checking for power at the motor. If the motor is getting power but not responding, replace it. It takes less than an hour, and if you use an after-market replacement motor, you can save almost $200 by doing the job yourself. Check with an auto parts store, dealer or online for replacement motors.
In most cases, the motor is mounted on the back of the transfer case and is held in place by a few small bolts. Follow the instructions in your shop manual to move the transfer case into the proper gear before removing the old motor.
Then disconnect the electrical connector and remove the shift-motor retaining bolts. The motor should pull straight off the shaft. If your shift motor has an interior ground wire (a black wire that goes from the shift motor to the inside of the transfer case), simply cut it and splice it into the new wiring connector. Solder the splice together and be sure to seal it with heat-shrinkable tubing to keep the connection watertight.
Finish the job by applying a light coat of RTV sealant around the edge of the motor flange. Slide the new motor onto the shaft, install the bolts and tighten to specs.
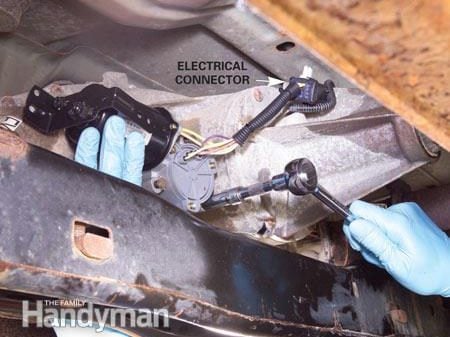
Replacing a Transfer Case Shift Motor: Reconnect the Wiring
Tighten the bolts and reconnect the electrical connector. Then go for a test drive to confirm it’s working properly.
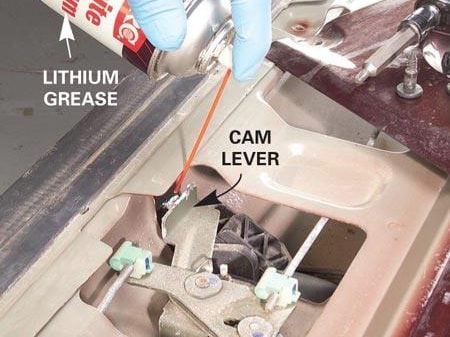
Lubricating the Tailgate Mechanism
Tailgates take a lot of abuse and swallow a lot of debris from your weekend projects. When that debris finds its way into the lock and latch mechanisms, you end up with a tailgate that either won’t open or won’t latch shut. It’s an easy fix that you can do with a socket set and a can of spray lithium grease.
Start by removing the access panel on the tailgate. (If you have a bed liner, you’ll have to remove the tailgate section before you get to the access panel.) Once the cover’s off, use compressed air to blow off the lock mechanism. Then apply a liberal coat of lithium grease to the cam/lever area and all pivot points.
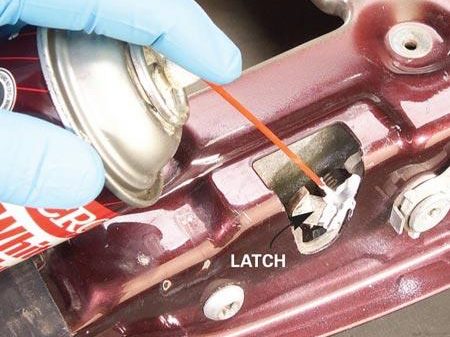
Lubricating Tailgate Latches
Spray the locking latch and spring with grease. Open and close the tailgate several times and spray the latches again.
Check out more do-it-yourself car maintenance tips!
Explore Reader’s Digest Cars.